
How I got my Schengen Short-Stay Visa to the Netherlands in TWO WEEKS
- Jul 22, 2025
- 7 min read
In continuation of my former post on obtaining my Kenyan passport in ten days, in this post, I will share how I obtained my Schengen Visa in about two weeks.
I will start by saying that the visa prep and application process was honestly one of the most intense experiences I’ve ever had😂. I think it’s because of how thorough it is, and the fact that the decision to approve or deny is totally out of my control. But, by the grace of God, it all went well, and in this post, I will share exactly the steps I took. Please note that I will be giving a breakdown of obtaining a Short-Stay Schengen Visa for visiting family and friends. The Schengen Area includes the following European Countries.
When it comes to applying for and gaining approval for a Schengen visa, three things are vital;
Submission of complete documentation.
A reason to come back to your home country.
Financial soundness.
I will briefly explain what each of these points entails.
Submission of complete documentation
When applying for a Schengen short-stay visa, there will be a checklist of documents that you will need to submit with your application.
Considering the process is thorough, increase your chances of acceptance by ensuring the documents are accurate and complete.
A reason to come back to your home country
This is one of the most vital determinants of your visa application. You’ll need to show that you are coming back to your home country before your visa expires, this is particularly if you're applying for a short stay visa, for travel or visit.
This can be you having a job, being enrolled as a student, marriage or owning significant assets in your home country.
Therefore, you’ll have to provide proof of this. For example, you may provide your job contract as proof of employment or your student enrollment letter if you’re a student.
Financial Soundness
You’ll need to demonstrate that during your stay, you can sustain yourself financially. You can prove this by providing your bank statements over a certain period to demonstrate that you receive income consistently. If you’re employed, your job contract will show how much you earn.
But, what if you’re a student/unemployed?
You can have someone sponsor you. Preferably, a resident of the country you intend to visit. There is an invitation letter they’d sign and demonstrate their financial ability to care for you while you’re there, by providing their proof of residency, their job contracts, and bank statements.
Okay, with these points in mind, how do you go about applying for a Short-Stay Schengen Visa?
STEP 1: Visit the Government of the Netherlands Visa Application Site
The link to this site is right here.
When you follow the steps outlined on the website, it will elaborate whether you'll need a visa for your travel, you'll get access to the Schengen visa application form, and the documents on the checklist that you'll need to provide as part of your application.
To get access to the Schengen Visa Application Form and the document checklist, you'll need to create an account via the Government of the Netherlands site.
According to ChatGPT and my personal experience, these were the documents needed;
Schengen visa application form - This is provided and filled out online. You will need to print it out and bring it with you during the appointment.
Valid passport - Ensure you have a valid passport. This is essential as the visa sticker will be placed on one of the pages.
Biometric photo: You will need passport photos that are compliant with ICAO rules and not older than 6 months.
Travel medical insurance: Yes, there IS such a thing as travel insurance. This will cover any medical bills you may incur when abroad. The insurance should have a minimum €30 000 coverage, and be valid throughout the Schengen area. A great travel insurance option in this case is OOM Insurance. *I'd also recommend paying the premium only after your visa is approved.
Flight itinerary: This is a brief rundown of the flight you plan to book. To get an itinerary, you don't have to book an actual flight. When 'booking' the flight, right before payment, most airlines will display the itinerary, i.e. from which airport you'll be coming from, to the one you'll be landing in. When generating the itinerary, 'book' a return flight/round trip. It shows you'll be coming back!
Proof of accommodation: Since I have family in the Netherlands, I'd be staying with. In the sponsor letter, there is a section for inputting the address.
Sponsor letter: During application, if you apply as one who has a sponsor, there will be a sponsor form to be filled out with your sponsor's details, such as their address; they'll need to provide a copy of their Dutch passport or proof of citizenship/residence permit. For more solid evidence, they may provide a copy of their bank statements to demonstrate financial capability to take care of you during your stay.
Visa fees: €80(Kshs12,000) + VFS service charge(Kshs2700) via M‑PESA (per VFS Kenya guidelines)
STEP 2: Book Your Appointment
After filling out the Schengen Visa Application Form and compiling the documents you'll need as per the provided checklist, you will need to book an appointment via the VFS Global website. VFS Global is the visa application center where all visa applications are received and taken to the Netherlands Embassy for processing.
Back in the day, you needed to go straight to the embassy to apply for your visa, but this has made things easier.
You'll need to appear in person for the appointment since your photograph and biometrics will be taken. There's also a small fee of Ksh. 2700 to book the appointment, which you'll pay as you book it.
After booking and payment, you will be sent a receipt that you'll need to carry with you to the appointment.
STEP 3: Attending The Appointment
I ensured to book an appointment early in the morning. So, on appointment day, I showed up at the VFS Center. It is located on the 5th Floor of Park Field building, off Waiyaki Way, Opposite Safaricom House. I carried all the documents that were required as per the checklist and the appointment receipt.
Once you arrive, you'd need to mention the country whose visa you're applying for, and show the receipt as evidence of your booking. The best appointment time is early morning, so if you can get such a slot, the better for you.
At the appointment, you'll submit your documents to the teller, who will then review them to ensure completeness and accuracy. Also, if you happen to forget to print a document or need any kind of printing services, there is a mini cyber on the floor. However, they are quite expensive, so try your best to have everything ready.
After reviewing your documents and ensuring everything is okay, you'll be directed to have your biometrics taken (photo and fingerprints). Then, you'll go back to the initial teller who will compile all your documents, and you'll then pay the Visa Fee, which is about 80 Euros for a Schengen Short-stay Visa. This translates to about Kshs12,000.
*I think one of the things that made this process intense for me is that the Visa Fee is non-refundable. So, if your visa is rejected, this money goes like that. 😥
The fee was slightly higher than Ksh 12k, as it includes a small extra cost for a courier service, which will deliver your passport to your residence after your visa has been processed.
After payment, you'll be given a receipt, and then you go home and wait.
STEP 4: Waiting for A Response
After this, you wait. Typically, visa processing takes about two weeks. This is subject to the seasons, though. During high peak seasons such as June-September and December, it can take up to 45 days, due to the large number of applications received at that time.
Since I applied in late March (an off-peak season), the processing time was much shorter.
STEP 5: Receiving The Visa
During processing, the embassy may reach out to you via email or call, in case additional information is needed to process the visa. If this happens, the most important thing is to be cooperative and provide complete documentation. For example, I was asked for additional information, and as I did, I had to ensure that I provided sufficient documentation.
Your fate lies in their hands, but do your best to increase your chances of having your visa approved.
After your Visa has been processed, you will get a notification via email informing you of this, and that your passport has been moved from the embassy to the VFS Application Center. A few days later, you may receive a call from the courier who will deliver your passport to your doorstep.
If your visa is approved, it will have a sticker that looks like the image below.
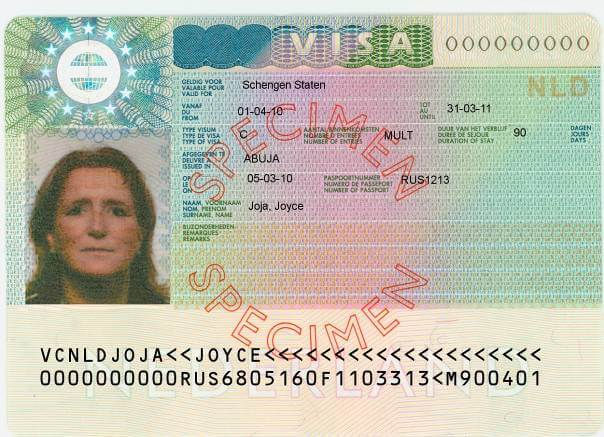
Once you receive it, immediately ensure your details, like your name and the period you applied for, are correct. In case of any corrections needed, contact the VFS Global center immediately to have it rectified as soon as possible.
If your visa has not been approved, you will receive your passport back sans a visa sticker, and a letter explaining why it has been denied. The most common reason for visa denial is a lack of complete documentation. You may object to the decision of visa denial, but that's a whole other process.
STEP 6: Preparing for your trip
Now that you have a visa, you can start preparing for your trip! Now, you can book the plane tickets and make any additional preparations!
In the next post, I will be sharing how to book a return plane ticket to the Netherlands.
Till next post,
Miss Kambe.

Comments